Senin, 11 Juni 2012

Conditional Sentence

In grammar, conditional sentences are sentences discussing factual implications or hypothetical situations and their consequences. Languages use a variety of conditional constructions and verb forms (such as the conditional mood) to form such sentences.
Full conditional sentences contain two clauses: the condition or protasis, and the consequence or apodosis.
If it rains [condition], (then) the picnic will be cancelled [consequence].
Syntactically, the condition is the subordinate clause, and the consequence is the main clause. However, the properties of the entire sentence are primarily determined by the properties of the protasis (condition) (its tense and degree of factualness).


English conditional sentences can be divided into the two broad classes of factual/predictive and hypothetical (counterfactual), depending on the form of the verb in the condition (protasis). The terms "factual" and "counterfactual" broadly correspond to the linguistic modalities called realis and irrealis.

Factual

In these constructions, the condition clause expresses a condition the truth of which is unverified. The verb in the condition clause is in the past tense (with a past tense interpretation) or in the present tense (with a present or future tense interpretation). The result clause can be in the past, present, or future. Generally, conditional sentences of this group are in two groups, the "zero conditional" and the potential or indicative conditional, often called "first conditional" or "conditional 1". This class includes universal statements (both clauses in the present, or both clauses in the past) and predictions.
The "zero" conditional is formed with both clauses in the present tense. This construction is similar across many languages. It is used to express a certainty, a universal statement, a law of science, etc.:
If you heat water to 100 degrees celsius, it boils.
If you don't eat for a long time, you become hungry.
If the sea is stormy, the waves are high.
It is different from true conditionals because the introductory "if" can be replaced by "when" or "whenever" (e.g., "When you heat water..."), which cannot be done for true condition. The potential or indicative conditional, often referred to as the "first conditional" or "conditional 1", is used more generally to express a hypothetical condition that is potentially true, but not yet verified. The conditional clause is in the present or past tense and refers to a state or event in the past. The result can be in the past, present, or future. Some examples with the condition clause in a past tense:
If she had taken that flight yesterday, she would have arrived at 10pm.
If she had taken that flight yesterday, she would be with us now.
If she took that flight yesterday, she is somewhere in town today.
If she took that flight yesterday, we will see her tomorrow.
A condition clause (protasis) in the present tense refers to a future event, a current event which may be true or untrue, or an event which could be verified in the future. The result can be in the past, present, or future:
If it's raining here now, then it was raining on the West Coast this morning.
If it's raining now, then your laundry is getting wet.
If it's raining now, there will be mushrooms to be picked next week.
If it rains this afternoon, then yesterday's weather forecast was wrong.
If it rains this afternoon, your garden party is doomed.
If it rains this afternoon, everybody will stay home.
If I become President, I'll lower taxes.
Certain modal auxiliary verbs (mainly will, may, might, and could) are not usually used in the condition clause (protasis) in English:
*If it will rain this afternoon, …
*If it may have rained yesterday, …
There are exceptions, however, in which will is used exactly as in the first example, namely when the action in the if clause takes place after that in the main clause:
(The weather forecast says it's going to rain.) Well, if it will rain, we must take umbrellas.
If aspirins will cure it, I'll [I will] take a couple tonight instead of this horrible medicine.[1]
Other situations in which will can be used in an if clause include when will is not being used as an auxiliary verb, in other words when it is being used modally to express willingness, persistence, or a wish:
If you'll [you will] just hold the door open for me a moment, I can take this table out to the kitchen.
If you will keep all the windows shut, of course you'll get headaches.
If you will excuse me, I think I will slip into something more comfortable.[1][2]
In colloquial English, the imperative is sometimes used to form a conditional sentence: e.g. "go eastwards a mile and you'll see it" means "if you go eastwards a mile, you will see it".

Counterfactual

In these constructions, the condition clause expresses a condition that is known to be false, or presented as unlikely. The result clause contains a conditional verb form consisting of would (or could, should, might) plus a main verb in the base form (infinitive without to).
The contrary-to-fact present conditional, often referred to as the "second conditional" or "conditional 2", is used to refer to a current state or event that is known to be false or improbable. The past subjunctive (or in colloquial English, simply the past tense) must be used:
If she were [colloq. was] at work today, she would know how to deal with this client.
If I were [colloq. was] the king, I could have you thrown in the dungeon.
The same structure can be used to refer to a future state or event:
If I won the lottery, I would buy a car.
If he said that to me, I would run away.
In many cases, when referring to future events, the difference between a realis and irrealis conditional is very slight:
(realis) If you leave now, you can still catch your train.
(irrealis) If you left now, you could still catch your train.
The contrary-to-fact past conditional (sometime referred to as the "third" conditional, conditional 3) is used to refer to contrary-to-fact past events. The pluperfect (or past perfect) is used in the condition clause.
If you had called me, I would have come.
If you had done your job properly, we wouldn't be in this mess now.
Some varieties of English regularly use would (often shortened to (I)'d) and would have (often shortened to (I)'d have) in counterfactual condition clauses, but this is often considered non-standard: If you'd leave now, you'd be on time. (conditional 2.) / If you (would)'ve told me, we could've done something about it. (conditional 3.) Such use of would is widespread especially in spoken US English in all sectors of society, but these forms are not usually used in more formal writing. Nevertheless, some reliable sources simply label this usage as acceptable US English and no longer label it as colloquial.[3][4]
There are exceptions, however, where would is used in British English too in seemingly counterfactual conditions, but these can usually be interpreted as a modal use of would: If you would listen to me once in a while, you might learn something. (conditional 2.) [1][2] In cases in which the action in the if clause takes place after that in the main clause, use of would in counterfactual conditions is however considered standard and correct usage in even formal UK and US usage: If it would make Bill happy, I'd [I would] give him the money.[1]
Should can appear in the condition clause to refer to a future event presented as possible, but unlikely, undesirable, or otherwise "remote": If I should die before I wake, …, If you should ever find yourself in such a situation, …

Logic

While the material conditional operator used in logic (i.e.\scriptstyle p \Rightarrow q) is sometimes read aloud in the form of a conditional sentence (i.e. "if p, then q"), the intuitive interpretation of conditional statements in natural language does not always correspond to the definition of this mathematical relation. Modelling the meaning of real conditional statements requires the definition of an indicative conditional, and contrary-to-fact statements require a counterfactual conditional operator, formalized in modal logic.

Examples

English

In English, there are three contexts for conditional sentences.
The first context involves the possible outcome of an event that is likely to occur:
If + Present Simple/Present Progressive + Present Simple/Present Progressive/Future Simple/Future Progressive/Imperative
  • If + I miss the bus, + I will be late for school
The second context involves the possible outcome of an event that is less likely to occur; various sentence structures are possible for this context:
If + Present Perfect/Present Perfect Progressive/Preterite/Past Continuous + Full Infinitive + Conditional Present/Conditional Present Progressive
  • If + I was + to miss the bus, + I would be late for school.
In some dialects: If + Imperfect Subjunctive + Full Infinitive + Conditional Present/Conditional Present Progressive
  • If + I were + to miss the bus, + I would be late for school.
In some dialects: If + modal auxiliary "should" + Bare Infinitive + Conditional Present/Conditional Present Progressive
  • If + I should + miss the bus, + I would be late for school.
The latter two formulations, with the imperfect subjunctive or the modal construction, can be modified to use subject-verb inversion instead of the conjunction if:
  • Were I + to miss the bus, + I would be late for school.
  • Should + I miss the bus, + I would be late for school.
The third context involves the hypothetical outcome of an event that did not occur:
If + Pluperfect/Pluperfect Progressive + Conditional/Conditional Progressive/Conditional Perfect/Conditional Perfect Progressive
  • If + I had missed the bus, + I would have been late for school.
Here too the conjunction if can be replaced by subject-verb inversion:
  • Had I missed the bus, + I would have been late for school.
In each formulation it is possible to reverse the order of the clauses; however, the protasis must always follow the word "if" or exhibit subject-verb inversion:
  • If + I miss the bus, + I will be late for school can be adjusted to I will be late for school + if + I miss the bus.
  • Should + I miss the bus, + I will be late for school can be adjusted to I will be late for school + should + I miss the bus.

Latin

Conditional sentences in Latin are traditionally classified into three categories, based on grammatical structure.
  • simple conditions (factual or logical implications)
    • present tense [if present indicative then indicative]
    • past tense [if perfect/imperfect indicative then indicative]
  • future conditions
    • "future more vivid" [if future indicative then future indicative]
    • "future less vivid" [if present subjunctive then present subjunctive]
  • contrafactual conditions
    • "present contrary-to-fact" [if imperfect subjunctive then imperfect subjunctive]
    • "past contrary-to-fact" [if pluperfect subjunctive then pluperfect subjunctive]

French

Si + Présent de l'indicatif + Présent de l'indicatif/Futur simple de l'indicatif/Présent de l'impératif
Si + Imparfait de l'indicatif + Présent du conditionnel
Si + Plus-que-parfait de l'indicatif + Passé du conditionnel

Italian

Italian includes the subjunctive in the second and third formulas, and does not allow the present to mix with the future in the first formula:
Se + Presente dell'indicativo + Presente dell'indicativo
Se + Futuro semplice dell'indicativo + Futuro semplice dell'indicativo
Se + Imperfetto del congiuntivo (subjunctive) + Presente del condizionale (or, more informal, Se + Imperfetto dell'indicativo + Imperfetto dell'indicativo)
Se + Trapassato (Pluperfect) del congiuntivo + Passato del condizionale

source:  http://en.wikipedia.org/wiki/Conditional_sentence

How to Make a Rainbow Cake


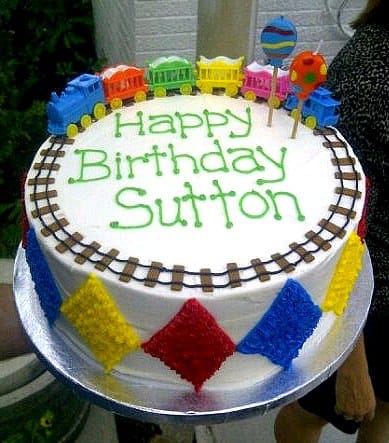
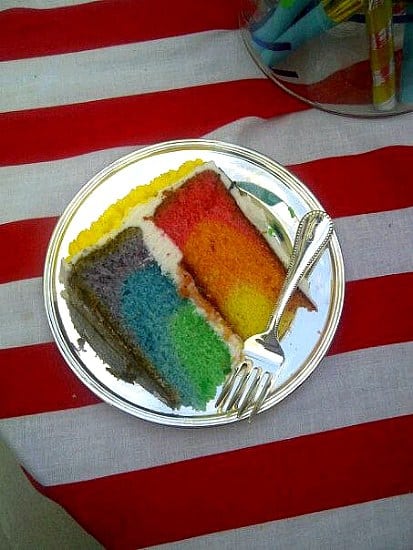
This past weekend I made a 2nd birthday cake for the nephew of one of my best friends. The decorations they wanted were fairly simple – a lot of bright, primary colors (much like what was used on the clown smash cake), with a train track running around the outside of the cake. The train set on the cake was used on birthday cakes when the little boy’s mom and aunt were little, and they wanted to continue the tradition. The track ended up being the perfect size to set the train on! But the real magic of this cake was on the inside… a rainbow cake!

I have made a few children’s cakes like this before, and have been asked how it’s done, so I thought it was high time that I put together a tutorial for you. It’s such a fun, whimsical way to brighten up a child’s birthday cake, and is incredibly easy to do. Below are the step-by-step instructions with photos. Have fun!

First up, you’ll want to have your favorite white cake recipe handy. My personal favorite is the Perfect Party Cake, but any of your favorite recipes will work, and you could always use a box mix too, if you prefer.
A quick note on cake recipes… I always use this Cake Batter Chart from Wilton when baking cakes that I’m going to decorate. They call for more batter than you would typically use, but the cakes bake up nice and tall and, once leveled, create wonderfully high layers. Not only is more cake better for everyone, but you have more space on the sides for decorating! To give you some perspective, a typical recipe for a 2-layer 9″ cake yields anywhere from 4 to 5 cups of batter.
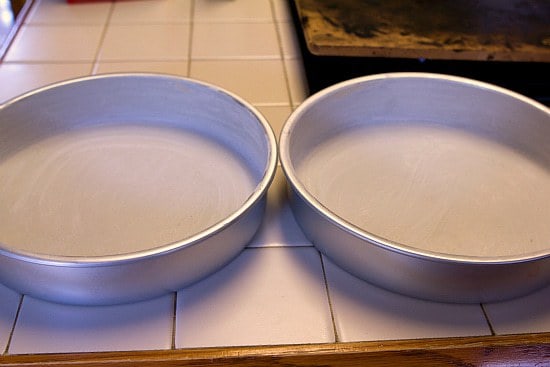
Now, grease and flour those cake pans!

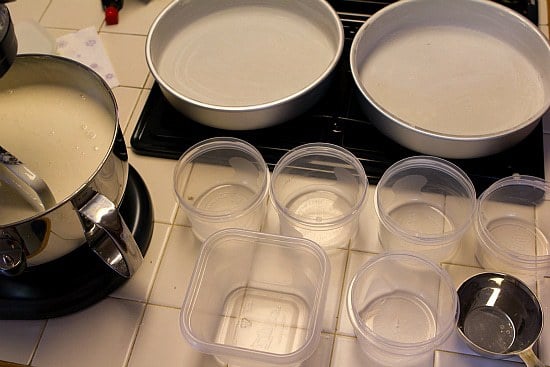
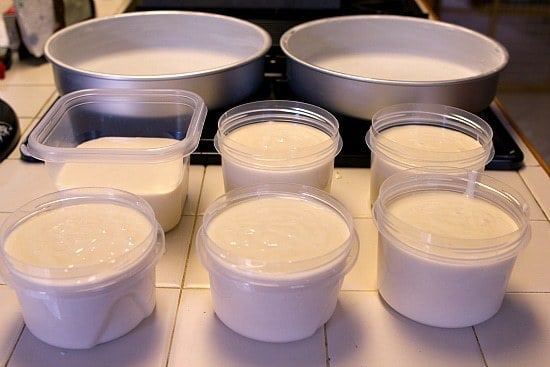
Next, mix up the batter for your cake and get 6 bowls (or your fanciest plasticware) ready…

You want to evenly divide your cake batter between the 6 bowls/containers. The best way to do this is to measure the batter into a large (4-cup) measuring cup (might have to do this two or three times) or to weigh the batter, and then do a quick “divided by 6″ to get the amount you should be scooping into each container. This is probably the hardest part of the whole process ;-)

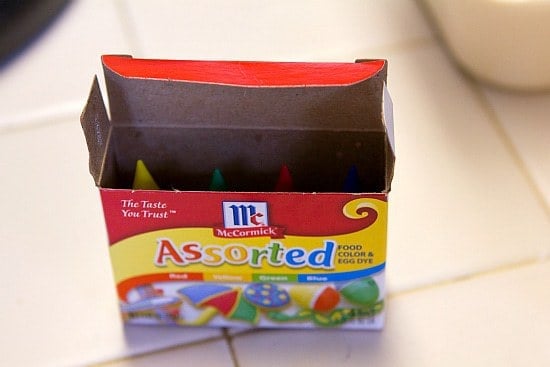
Now, round up your food coloring – liquid or gels. A lot of people have said they have great success with the AmeriColor gels, but I still had some liquid food coloring from other recipes to use up, so I went that route.

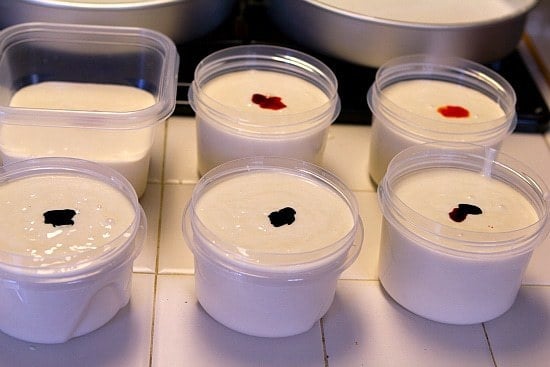
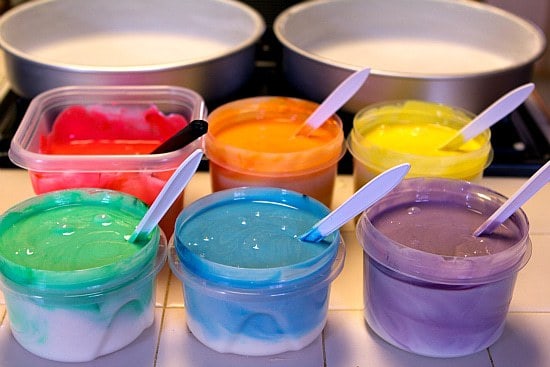
Time to color away! You’ll want to make the fun rainbow colors, naturally: red, orange, yellow, green, blue and purple. If you’re using the little 4-color kit like me, just combine red + yellow for orange, yellow + blue for green, and red + blue for purple.

Use as much as needed to get the color hue you’re going for. (Alternately, you could really do this for any color combinations you’d like. You can keep half plain white and the other half brown to do a zebra. Reader Julie on Facebook mentioned she saw a cake like this with varying shades of pink, and you could definitely do that as well.)

Now, we’re ready to load up the cake pans. You have two options here:
Option #1: You can make one cake layer red, orange and yellow, and make the second layer green, blue and purple. I chose to do the cake this way so that the individual colors really popped and you could see all of them really well.
Option #2: You can do all six colors in each layer. To do it this way, divide each color in half between the pans. So, half of the red would go in one pan, and the other half in the other pan, and then proceed the same way.
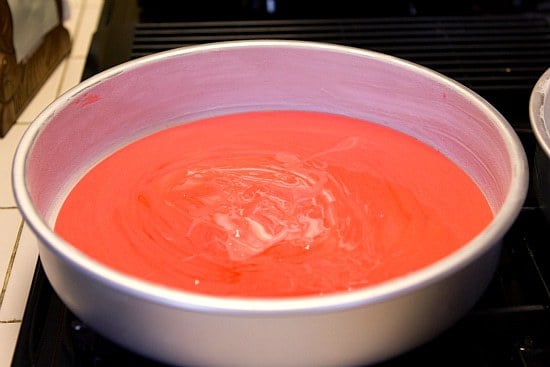
As I mentioned, I used Option #1, so that’s what you’ll see illustrated here. First, pour the red batter into the bottom of the cake pan.

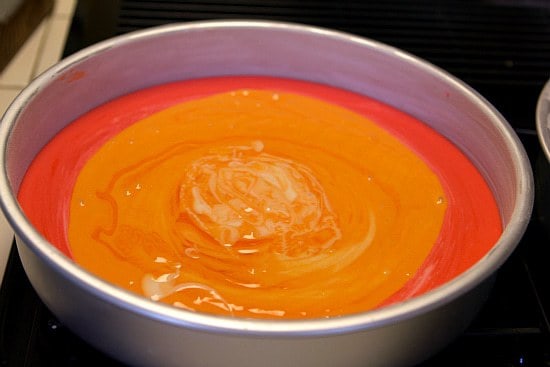
Next, add the orange batter on top of the red. Slowly pour the batter into the middle of the pan. As you do so, the red layer below it will spread out.

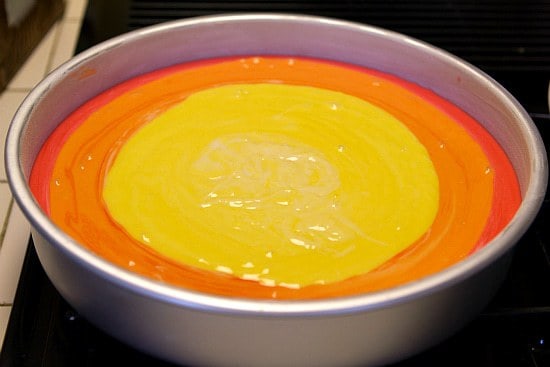
Finally, pour the yellow batter in the same way you poured the orange.

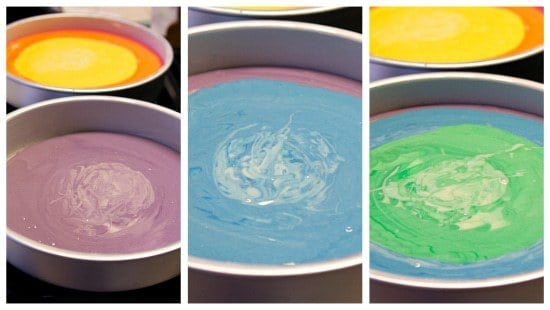
Repeat the process in the other cake pan, starting with the purple, and then adding the blue and green.

Bake those babies up!
Once the cakes have completely cooled, I like to wrap them in plastic wrap and refrigerate them for at least an hour. I find that it’s much easier to level cold cakes then room temperature ones. They are firmer and don’t crumble, making for a cleaner cut.
I use this Wilton Cake Leveler to level my cakes. It’s super cheap (less than $5 – you can find them at a place like Michael’s), and makes it incredibly easy to make sure the cakes are sliced evenly and cleanly.
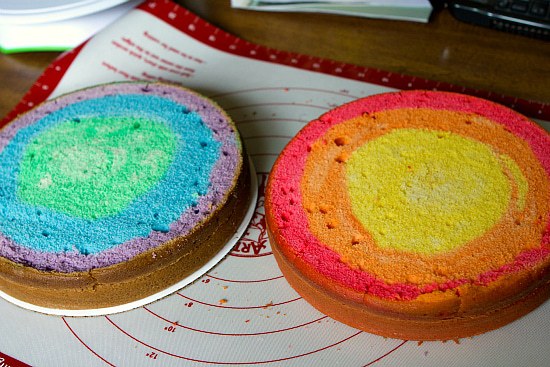
Here’s what the tops of the cakes looked like after they were leveled… so colorful!

At this point, I went ahead and filled the cake and then decorated it.
I received a couple of questions on how to make the train tracks on top of the cake, so I’ve included that short description below as well.

How to Make Train Tracks

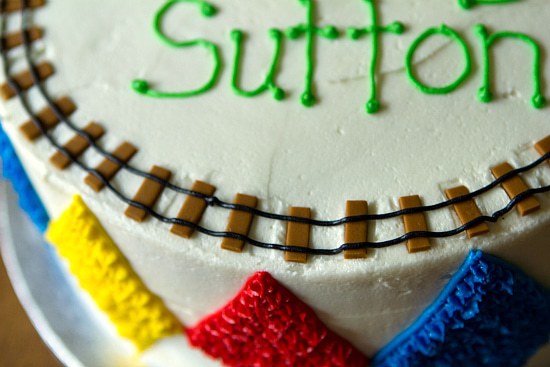
My friend told me that the tracks needed to be ¾-inch wide in order to accommodate the plastic trains that they wanted to decorate the cake with. I used brown fondant rolled out to about 1/16-inch thickness, and then cut a long strip ¾-inch wide. From there, I cut across the strip in ¼-inch increments until I had as many “tracks” as I needed.
Once I was ready, I spaced them evenly around the cake. To make the rails, I used a #2 decorating tip with black icing.

And here was the finished cake, before it went out for delivery and got adorned with the adorable train set that you saw in the first picture.
(Thank you to my friend Renee for snapping those pictures for me so I would have photos of the cake with the train on it, and the inside of the cake once it was cut!)


source:  http://www.browneyedbaker.com/2011/09/14/how-to-make-a-rainbow-cake/

Paris

Paris
Motto: Fluctuat nec mergitur (Latin: "It is tossed by the waves, but does not sink")
Paris - Eiffelturm und Marsfeld2.jpg
Paris, with the Eiffel Tower in the foreground and the skyscrapers of La Défense in the background
Flag of Paris
Coat of arms of Paris
City flag City coat of arms
Paris is located in France
Paris
Administration
Country France
Region Île-de-France
Department Paris
Mayor Bertrand Delanoë (PS)
(2008–2014)
Statistics
Land area1 [1] 105.4 km2 (40.7 sq mi)
Population2 2,211,297  (Jan. 2008[2])
 - Ranking 1st in France
 - Density 20,980 /km2 (54,300 /sq mi)
Urban area 2,845 km2 (1,098 sq mi) (2010)
 - Population 10,354,675[3] (Jan. 2008)
Metro area 17,175 km2 (6,631 sq mi) (2010)
 - Population 12,089,098[4] (Jan. 2008)
Time zone CET (UTC +1)
INSEE/Postal code 75056/ 75001-75020, 75116
Website www.paris.fr
1 French Land Register data, which excludes lakes, ponds, glaciers > 1 km² (0.386 sq mi or 247 acres) and river estuaries.
2 Population without double counting: residents of multiple communes (e.g., students and military personnel) only counted once.
Paris (Listeni/ˈpærɨs/; French: [paʁi] ( listen)) is the capital and largest city of France. It is situated on the river Seine, in northern France, at the heart of the Île-de-France region (or Paris Region, French: Région parisienne). As of January 2008 the city of Paris, within its administrative limits (the 20 arrondissements) largely unchanged since 1860, has an estimated population of 2,211,297[2] and a metropolitan population of 12,089,098[4], and is one of the most populated metropolitan areas in Europe.[5] Paris was the largest city in the Western world for about 1,000 years, prior to the 19th century, and the largest in the entire world between the 16th and 19th centuries.[6][7][8]
Paris is today one of the world's leading business and cultural centres, and its influences in politics, education, entertainment, media, fashion, science, and the arts all contribute to its status as one of the world's major global cities.[9][10][11][12] It hosts the headquarters of many international organizations such as UNESCO, the OECD, the International Chamber of Commerce or the European Space Agency. Paris is considered one of the greenest[13] and most liveable[14] cities in Europe. It is also one of the most expensive.[15][16]
Paris and the Paris Region, with €552.1 billion (US$768.9 billion) in 2009, produce more than a quarter of the gross domestic product of France.[17] According to 2008 estimates, the Paris agglomeration is Europe's biggest[18] or second biggest[19] city economy and the sixth largest in the world.[20] The Paris region is the first in Europe in terms of research and development capability and expenditure[21] and through its 17 universities and 55 grandes écoles has the highest concentration of higher education students in the European Union.[21] With about 42 million tourists annually in the city and its suburbs,[21] Paris is the most visited city in the world. The city and its region contain 3,800 historical monuments and four UNESCO World Heritage 


source:  http://en.wikipedia.org/wiki/Paris

Apple iPad 3 vs Samsung Galaxy Tab 10.1

ntroduction:

Now that the iPad 2 has made way for its successor in the new iPad, it’s only fitting to pit Apple’s latest baby against the horde of competition that are already littered across the tablet landscape. Rising above most  other things, the Samsung Galaxy Tab 10.1 LTE comes to mind as a dubious competitor since it’s regarded as the best of the best from Samsung’s camp. On the surface, both are very similar with their options, which is hardly a surprise, but as we’ve come to expect, there can only be one that will ultimately prove itself to be the sole standout hit. Before diving in, it’s worth noting that the Apple iPad 4G LTE’s price starts at $629.99 for both AT&T and Verizon variants, whereas the Samsung Galaxy Tab 10.1 LTE is a bit more at $699.99 through Verizon only.


Design:

From a distance, the two look similar to one another, but once we’re able to grasp both in our hands, the new iPad is able to deliver the impactful wow factor thanks to its premium feel. Well, it’s not to say that the Samsung Galaxy Tab 10.1 isn’t a bad looker, especially when it’s the lighter and slightly thinner tablet, but its all-plastic body doesn’t have the allure to match the impeccable industrial design of the iPad. Indeed, the new iPad’s appearance might not bring anything fresh to the table, especially when its design is a recycled one, but nonetheless, its iconic look combined with its premium construction still hits the high marks in our books.

The Apple iPad 3 (left) and the Samsung Galaxy Tab 10.1 (right) - Apple iPad 3 vs Samsung Galaxy Tab 10.1
The Apple iPad 3 (left) and the Samsung Galaxy Tab 10.1 (right)

No doubt we dig the responsiveness exhibited by the physical buttons available on both tablets, but the ones on the iPad are raised higher to offer better distinguishability with our fingers. As for charging and data connectivity, both resort to using proprietary 30-pin connection ports, which is also the way they’re able to gain video-out functionality with the aid of optional accessories. For all of you audio buffs, the iPad has a single speaker located of the bottom left corner of its rear, while the Samsung Galaxy Tab 10.1 boasts stereo sound thanks to its two speakers.

Power buttons - The Apple iPad 3 (bottom) and the Samsung Galaxy Tab 10.1 (top) - Apple iPad 3 vs Samsung Galaxy Tab 10.1
Volume rockers - The Apple iPad 3 (bottom) and the Samsung Galaxy Tab 10.1 (top) - Apple iPad 3 vs Samsung Galaxy Tab 10.1
Connection ports - The Apple iPad 3 (bottom) and the Samsung Galaxy Tab 10.1 (top) - Apple iPad 3 vs Samsung Galaxy Tab 10.1
Speakers - The Apple iPad 3 (bottom) and the Samsung Galaxy Tab 10.1 (top) - Apple iPad 3 vs Samsung Galaxy Tab 10.1
Power buttons
Volume rockers
Connection ports
Speakers
The Apple iPad 3 (bottom) and the Samsung Galaxy Tab 10.1 (top)
In terms of cameras, there’s plenty to like since the Samsung Galaxy Tab 10.1 is outfitted with a 3.2-megapixel snapper with LED flash. Conversely, there might not be a flash on the new iPad, but rather, it’s impressiveness is found with its 5-megapixel iSight camera, which features an F2.8 aperture lens and sensor with backside illumination. On the other hand, front-facing cameras are naturally available with both, as the Galaxy Tab 10.1 packs a higher count 2-megapixel camera, versus the paltry VGA snapper on the iPad.

Rear cameras - The Apple iPad 3 (left) and the Samsung Galaxy Tab 10.1 (right) - Apple iPad 3 vs Samsung Galaxy Tab 10.1
Front-facing cameras - The Apple iPad 3 (left) and the Samsung Galaxy Tab 10.1 (right) - Apple iPad 3 vs Samsung Galaxy Tab 10.1
Rear cameras
Front-facing cameras
The Apple iPad 3 (left) and the Samsung Galaxy Tab 10.1 (right)

Display:

Absolutely, if there’s one reason why the new iPad is such a feared competitor, it has to be none other than the crisp and super detail Retina display it’s bringing to the tablet. Comparing the two, the numbers seemingly do all the talk as the iPad boasts a mind-bending resolution of 2048 x 1536, which blows away the 1280 x 800 resolution of the Galaxy Tab 10.1. Although it’s hardly noticeable to visually see the superiority of the iPad’s Retina display from a far distance, it’s evident once we take a peek at our web site at a full zoomed out view. At times, the iPad’s display is simply surreal with its stunning visuals. Details aside, both offer wide-viewing angles, high contrasts, and natural looking colors – though, the iPad’s display tends to come off warmer looking. When it comes down to it, however, the iPad has the eye candy to pique anyone’s interest from afar.

source:  http://www.phonearena.com/reviews/Apple-iPad-3-vs-Samsung-Galaxy-Tab-10.1_id2975

How to Make Macarons: A Detailed, Illustrated Step-by-Step Recipe Macarons are a French delicacy I am completely crazy about. Since I can’t always be in Paris close to my favorite pastry-chef, Pierre Hermé, I have decided to make my own. It’s not an easy task, and it needs a lot of patience. I learned how to make them in Paris, but when I came back I searched around the internet for some recipes providing the perfect ratios. I learned the hard way that macarons are capricious little wonders: add a bit of this or that, and your delicate balance tips over; I’ve seen my share of overbaked, flat, cracked or overinflated numbers coming out of my oven. No recipe is universal, and the most important thing is to go slow. Try cautiously with your own instruments, ingredients and oven. You will have to try more than once before achieving perfection. If they were so easy to do, wouldn’t everyone make them? When I was looking around for recipes, I found plenty but few had illustrated steps to guide you through what’s OK or not in terms of texture, color and result. Since you can’t always have an experienced teacher showing you the first time, I figured I would allow you to benefit from my apprentissage and help you get to a happy result more quickly. No single source can be given as a base for my recipe. I have gathered dozens left and right, tested and tasted and ended with my own proportions. Now I (almost) always make them successfully, so this is a good base to start with. I will guide you through the rest. - Having trouble making macarons? Since first publishing this post, struggling macaron-makers have asked me every question under the sun. After over two years (and hundred of comments!), I’ve decided to close the comments on my macaron posts, but I’m not leaving you an excellent resource: I’ve gathered the most frequently asked questions I’ve been asked about macarons in one single post: A Macaron Troubleshooting Guide: Useful Tips and Advice to Master the French Delicacy. If you’re having any trouble making macarons, chances are you’ll find answers in that post. You can also read through the comments left below, I did my best to reply to all of them and many (if not all!) macaron issues are covered in there as well. If I missed something, send me a note and I promise I will keep on editing the troubleshooting post once in a while! - I have put together a short 5-minute video that shows you the key steps in making French macarons at home. There’s nothing like having someone show you the way – at least, that’s how I learned. The video, along with this post’s detailed instructions and pictures, should allow anyone wanting to make this French delicacy at home succeed. Watch the video below, or better yet, click here to view it in high-definition on YouTube. You’ll be able to read the instructions more easily and see all the important details much better. See also my “All About Macarons” page for more resources and links. - Macarons: Basic Recipe These ingredients will make the cookies. This is the base and what’s hardest to master. You should try to successfully bake a couple recipes of basic macarons before trying to mix in other flavors. 3 egg whites (from large eggs), separated at least 24 hours in advance and kept in the refrigerator 210 g powdered sugar 125 g almond meal 30 g regular granulated sugar What you need – equipment: It’s best to gather all the equipment you really need before starting. Yes, I did have to buy some of these tools before making my first macarons. The good thing is that none of the following tools are specific to making macarons so your new gadgets will help you make many other great desserts. Please, do take this excuse and go shopping. :) Kitchen scale (yes, you do have to measure in grams, it’s more precise) Food processor (really nice to have but not mandatory) Hand or stand mixer with whisk accessory (mandatory unless you’re very courageous and/or strong) Sifter or fine sieve Big stainless steel bowl (cul-de-poule) Another big mixing bowl Spatula Pastry bag and round tip (1/2 to 3/4 inch opening) Large baking sheets, preferably 2 to 4 of them Parchment paper Various food color (liquid, gel or powder are all good) A couple of days before you plan to make your macarons: Prepare your eggs. Separate them, putting the whites in a clean airtight container and reserving the yolks for another use. Now, your egg whites must “age”: they need to spend at least 24h (up to 5 days) in the refrigerator before you use them. The morning of the day you plan to make your macarons: Take your egg whites out of the refrigerator and leave them to temper at room temperature for several hours. Making the cookies: Measure the powdered sugar and almond meal and put them in the bowl of your food processor. Finely grind the two together for a minute or two. Stop the processor, scrape the sides and bottom of the bowl, and process again for a minute. Yes, you need to do this even though both ingredients are already powdered. This step blends the sugar and nuts perfectly together and gets rid of bigger bits that often remain in packaged almond meal. You can grind your own almonds, just make sure they are peeled. And that you very finely grind them (add the powdered sugar to the almonds when they are coarsely ground to make sure you don’t end up with a paste). If you don’t have a food processor, you can still make macarons, but make sure to really thoroughly blend the almonds and sugar together. The consequence is that the texture of your macarons won’t be as soft and smooth. After processing the powdered sugar and almond meal, you have to sieve the mixture. This is really important (especially if you don’t have a food processor) as it will get rid of the remaining bigger bits and ensure a smooth batter. You will see some of the almond refuses to pass though your sieve (see picture below). Don’t try to force it through; it’s ok to throw it away. The quantity shouldn’t be significant enough to unbalance your recipe. Here’s what I generally have left after I sieve half of my almonds-sugar mixture: How to Make Macarons Set this bowl aside and take your bigger stainless steel bowl out. This kind of bowl is called a cul-de-poule in French and they are so useful in a kitchen that, if you don’t have one already, you simply really should invest in a couple of them (different sizes). Stainless steel bowls helps egg whites get fluffy and firm. Make sure your bowl is cold. Stainless steel usually remains cold by itself, but if it’s not, rinse it under cold water (or stick it in the freezer for a couple of minutes) and dry it before continuing. A cold bowl also makes egg whites happy. Make sure your granulated sugar is measured and close to your working area. Put your egg whites in the bowl. Start beating them at medium/high speed with your mixer. Once they start to get bubbly and white and you see your whisk is lightly leaving marks, add a tablespoon of the granulated sugar. How to Make Macarons Continue beating and add the remaining sugar slowly over the next minute or two. Your eggs will now be white and fluff but not stiff enough. Continue beating at high speed until peaks form and remain up when you take out your whisk (stop your mixer before trying this!). When the egg whites are ready, you’ll notice that they seem dense and creamy and not as bubbly anymore. Here’s what they look like: How to Make Macarons How to Make Macarons Now is the time to put your electric appliances aside. Your egg whites are delicate and you must treat them gently. If you wish to add color, now is the time to do so. I made lemon macarons. I added 15 drops of yellow liquid food coloring and the very finely grated zest of one lemon. Gently fold in the color using a spatula: slide your spatula on the side of the bowl under the egg whites and bring the bottom up to the top. Repeat this until the color is evenly blended. Now is not the time to be in a hurry: DO NOT whisk at any cost as it will deflate your egg whites and your batter will be ruined. At this point, the color of your batter (if you added food coloring) should be at least as intense as you want the final macaron to be. It will intensify and brighten a bit when you add the almonds/sugar mixture. The batter is now matte, light and fluffy: How to Make Macarons Continuing your folding motion, start mixing in your dry ingredients a little at a time (you should add the whole thing in 4 or 5 additions). Carefully blend everything together, always sliding your spatula to the bottom of the bowl and back up to make sure no pockets of dry ingredients remain. When your batter is evenly blended, it will look shiny and creamy: How to Make Macarons Prepare your baking sheets. Double the baking sheets (helps macarons rise and cook more evenly) then cover each with a well-measured sheet of parchment paper. I have tried silicon mats before and I don’t think they work well with macarons. Their rubbery texture seems to cling to the delicate and somewhat sticky cookies so that you more often than not end up with empty shells (the tender insides remaining stuck to the silicon). How to Make Macarons Now is the time to fit your pastry bag with its tip. I like to use disposable pastry bags that I wash 3-4 times before getting rid of them. I find that plastic pastry bags are more flexible and easier to work with than textile bags. They are also really easy to clean just by letting hot water run through them and they don’t stain. To make the transfer from bowl to pastry bag easy, I stand my pastry bag in a measuring cup, folding or twisting the tip to make sure the batter doesn’t come out too quickly. If your pastry bags are long, fold it in half to make sure the batter gets to the bottom of the bag. How to Make Macarons Take your bag out of the cup, keeping the tip folded or twisted so that the batter doesn’t come out. Unfold the larger end of the bag and twist it shut close to the batter to push it down. As you lay your macarons on the cooking sheets, you will continue this motion (twisting the larger end of the bag with one hand) to put constant pressure on the batter and ease its way out on the sheets. Now is the time to work your magic: you have to hold the tip of your bag with one hand to guide it, and hold the larger end with your other hand to push the batter down. Place your tip close to the parchment paper and twist the end of the bag so as to push the batter down and out to form 1 to 1.5” disks. You can set your macarons pretty close together as they won’t expand while cooking. When enough batter is out, stop twisting the end of the bag and swiftly lift your tip up to stop the batter from coming out. This is tricky: you will need practice. Mastering this technique will ensure your macarons are uniform in size and round. How to Make Macarons Now, don’t panic. Your macarons have a pointy tip that makes them look like lazy Hershey’s Kisses. Not to worry: as they rest before cooking, they will smooth out. You can help them though: lift your baking sheet up a bit and firmly bang it on the table a couple of times. This will even the caps and take the air bubbles out of them. If you’re a perfectionist like I am, now is a good time to edit your macarons to make sure they will be perfectly round. I use a small silicon spatula to make oval caps round or smooth down tips that won’t come down. This step is absolutely not mandatory; imperfection can be very charming. The next step will once again test your patience: you have to let your macarons rest on the baking sheets at room temperature for at least 20 minutes (some say a couple hours is best but I’m not that patient). You just have to. This step will “dry” the caps and help them rise later when they cook. How to Make Macarons Halfway through the wait, preheat your oven between 275 and 300°F (135-150°C). Every oven behaves differently. I have a gas oven and 300°F (150°C) is generally good for me. In some ovens, this temperature can be too hot, especially for light-colored macarons (you don’t want them to brown). I prefer to play it safe, cook them at a lower temperature and leave them longer in the oven. You will have to test your own oven and stay close to it to watch over your macarons as they cook. I baked these lemon macarons at 300°F (150°C) for 14 minutes. Your cooking time could be anywhere between 13 and 18 minutes. From 12 minutes on, watch closely, and avoid opening your oven door before that. Your macarons are ready when they look dry and matte and seem firm on their crown when you lightly tap on them. Overcooking the macarons will make them too crunchy and feel like meringue. Undercooking them will make them separate when you try to lift them off the sheets. I know, it’s tricky! After a while, you will know your oven and get better at figuring when your macarons are done. In any case, please play it safe when setting your oven temperature. Excessive heat is the macaron’s worst enemy: they will cook too quickly, cracking like meringue and browning, hiding their beautiful color. When they are done, take the sheets out of the oven and let them cool on a rack. If you need to reuse your baking sheets for the next batch, let them cool 5-10 minutes in the baking sheet and then lift the parchment paper out of the sheet to set it directly on the cooling rack (this is why it’s good to have more than 2 sheets). Once cooled to room temperature, your macarons are ready to be assembled. How to Make Macarons When they are perfectly cooked, they should lift easily from the parchment paper, have a flat bottom and a beautiful puffy crown. If they stick a bit, help them up with a thin stainless steel spatula so that they don’t separate or break. If they’re a bit overcooked, they will be hollow under the cap. You can still use them, you’ll just have to put more cream to assemble them (yum!). Match the cap sizes that fit best together. For the filling, the possibilities are as great as your imagination is. For lemon macarons, you can fill them up with lemon curd as I did, or with a lemon-flavored buttercream. If you made pink cookies, fill them up with good-quality raspberry preserves or, if you feel decadent, with a mixture of mascarpone cheese and preserves. The only thing that’s important is to make sure the filling is firm enough to not drip out from the macarons. A great macaron should be able to stand on its side and not lose its filling. Using an icing spatula (or just a regular butter knife) spread your icing on one cookie. Place the other cookie on the icing and press gently to stick them together. Once all of your macarons are assembled, in an ideal world, you would put them in an airtight container, in the refrigerator and let them rest for another 24 hours. Yes, you need patience once again. They won’t be bad if you eat them right away. Letting them rest with their icing in really reveals the fine texture of the macaron. The humidity of the icing will get into the crispy caps and that’s what will make them crisp on the outside and so tender on the inside. Try to be patient, trust me, it’s really worth the wait. The good thing is that it’s a great dessert to make in advance and it will for sure impress your guests. They will be at their best if you eat them in the next 4-5 days. Yes, these French cookies are a really fancy delicacy. No, they’re not easy to make. Yes, they require time, patience and practice to master. But it’s worth it really, and less expensive than a plane ticket to Paris. How to Make Macarons
Macarons are a French delicacy I am completely crazy about. Since I can’t always be in Paris close to my favorite pastry-chef, Pierre Hermé, I have decided to make my own. It’s not an easy task, and it needs a lot of patience. I learned how to make them in Paris, but when I came back I searched around the internet for some recipes providing the perfect ratios. I learned the hard way that macarons are capricious little wonders: add a bit of this or that, and your delicate balance tips over; I’ve seen my share of overbaked, flat, cracked or overinflated numbers coming out of my oven. No recipe is universal, and the most important thing is to go slow. Try cautiously with your own instruments, ingredients and oven. You will have to try more than once before achieving perfection. If they were so easy to do, wouldn’t everyone make them?

When I was looking around for recipes, I found plenty but few had illustrated steps to guide you through what’s OK or not in terms of texture, color and result. Since you can’t always have an experienced teacher showing you the first time, I figured I would allow you to benefit from my apprentissage and help you get to a happy result more quickly.
No single source can be given as a base for my recipe. I have gathered dozens left and right, tested and tasted and ended with my own proportions. Now I (almost) always make them successfully, so this is a good base to start with. I will guide you through the rest.
-
Having trouble making macarons? Since first publishing this post, struggling macaron-makers have asked me every question under the sun. After over two years (and hundred of comments!), I’ve decided to close the comments on my macaron posts, but I’m not leaving you an excellent resource: I’ve gathered the most frequently asked questions I’ve been asked about macarons in one single post: A Macaron Troubleshooting Guide: Useful Tips and Advice to Master the French Delicacy. If you’re having any trouble making macarons, chances are you’ll find answers in that post. You can also read through the comments left below, I did my best to reply to all of them and many (if not all!) macaron issues are covered in there as well.
If I missed something, send me a note and I promise I will keep on editing the troubleshooting post once in a while!
-
I have put together a short 5-minute video that shows you the key steps in making French macarons at home. There’s nothing like having someone show you the way – at least, that’s how I learned. The video, along with this post’s detailed instructions and pictures, should allow anyone wanting to make this French delicacy at home succeed.
Watch the video below, or better yet, click here to view it in high-definition on YouTube. You’ll be able to read the instructions more easily and see all the important details much better.
See also my “All About Macarons” page for more resources and links.
-
Macarons: Basic Recipe
These ingredients will make the cookies. This is the base and what’s hardest to master. You should try to successfully bake a couple recipes of basic macarons before trying to mix in other flavors.
3 egg whites (from large eggs), separated at least 24 hours in advance and kept in the refrigerator
210 g powdered sugar
125 g almond meal
30 g regular granulated sugar
What you need – equipment:
It’s best to gather all the equipment you really need before starting. Yes, I did have to buy some of these tools before making my first macarons. The good thing is that none of the following tools are specific to making macarons so your new gadgets will help you make many other great desserts. Please, do take this excuse and go shopping. :)
Kitchen scale (yes, you do have to measure in grams, it’s more precise)
Food processor (really nice to have but not mandatory)
Hand or stand mixer with whisk accessory (mandatory unless you’re very courageous and/or strong)
Sifter or fine sieve
Big stainless steel bowl (cul-de-poule)
Another big mixing bowl
Spatula
Pastry bag and round tip (1/2 to 3/4 inch opening)
Large baking sheets, preferably 2 to 4 of them
Parchment paper
Various food color (liquid, gel or powder are all good)
A couple of days before you plan to make your macarons: Prepare your eggs. Separate them, putting the whites in a clean airtight container and reserving the yolks for another use. Now, your egg whites must “age”: they need to spend at least 24h (up to 5 days) in the refrigerator before you use them.
The morning of the day you plan to make your macarons: Take your egg whites out of the refrigerator and leave them to temper at room temperature for several hours.
Making the cookies:
Measure the powdered sugar and almond meal and put them in the bowl of your food processor. Finely grind the two together for a minute or two. Stop the processor, scrape the sides and bottom of the bowl, and process again for a minute.
Yes, you need to do this even though both ingredients are already powdered. This step blends the sugar and nuts perfectly together and gets rid of bigger bits that often remain in packaged almond meal.
You can grind your own almonds, just make sure they are peeled. And that you very finely grind them (add the powdered sugar to the almonds when they are coarsely ground to make sure you don’t end up with a paste).
If you don’t have a food processor, you can still make macarons, but make sure to really thoroughly blend the almonds and sugar together. The consequence is that the texture of your macarons won’t be as soft and smooth.
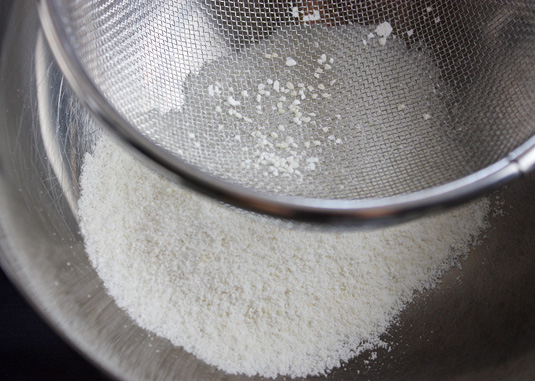
After processing the powdered sugar and almond meal, you have to sieve the mixture. This is really important (especially if you don’t have a food processor) as it will get rid of the remaining bigger bits and ensure a smooth batter. You will see some of the almond refuses to pass though your sieve (see picture below). Don’t try to force it through; it’s ok to throw it away. The quantity shouldn’t be significant enough to unbalance your recipe.
Here’s what I generally have left after I sieve half of my almonds-sugar mixture:
How to Make Macarons
Set this bowl aside and take your bigger stainless steel bowl out. This kind of bowl is called a cul-de-poule in French and they are so useful in a kitchen that, if you don’t have one already, you simply really should invest in a couple of them (different sizes). Stainless steel bowls helps egg whites get fluffy and firm.
Make sure your bowl is cold. Stainless steel usually remains cold by itself, but if it’s not, rinse it under cold water (or stick it in the freezer for a couple of minutes) and dry it before continuing. A cold bowl also makes egg whites happy.
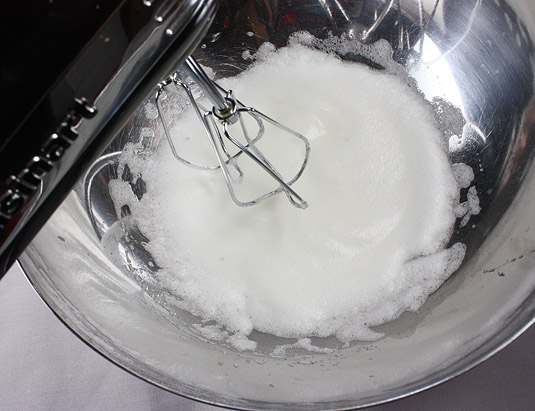
Make sure your granulated sugar is measured and close to your working area. Put your egg whites in the bowl. Start beating them at medium/high speed with your mixer. Once they start to get bubbly and white and you see your whisk is lightly leaving marks, add a tablespoon of the granulated sugar.
How to Make Macarons
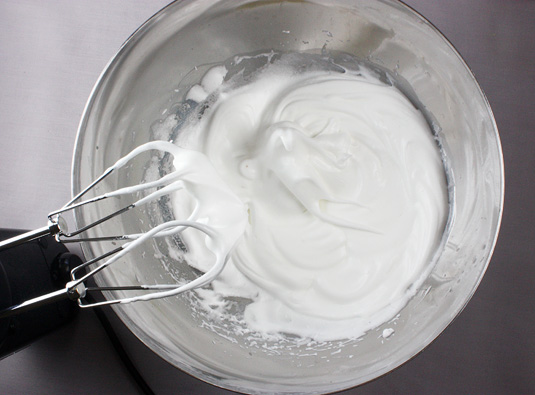
Continue beating and add the remaining sugar slowly over the next minute or two. Your eggs will now be white and fluff but not stiff enough. Continue beating at high speed until peaks form and remain up when you take out your whisk (stop your mixer before trying this!). When the egg whites are ready, you’ll notice that they seem dense and creamy and not as bubbly anymore. Here’s what they look like:
How to Make Macarons
Now is the time to put your electric appliances aside. Your egg whites are delicate and you must treat them gently. If you wish to add color, now is the time to do so. I made lemon macarons. I added 15 drops of yellow liquid food coloring and the very finely grated zest of one lemon. Gently fold in the color using a spatula: slide your spatula on the side of the bowl under the egg whites and bring the bottom up to the top. Repeat this until the color is evenly blended. Now is not the time to be in a hurry: DO NOT whisk at any cost as it will deflate your egg whites and your batter will be ruined. At this point, the color of your batter (if you added food coloring) should be at least as intense as you want the final macaron to be. It will intensify and brighten a bit when you add the almonds/sugar mixture.
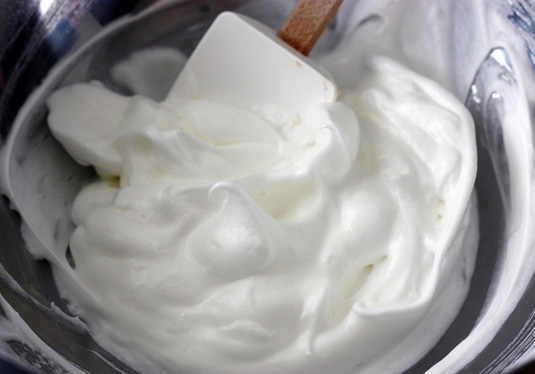
The batter is now matte, light and fluffy:
How to Make Macarons
Continuing your folding motion, start mixing in your dry ingredients a little at a time (you should add the whole thing in 4 or 5 additions). Carefully blend everything together, always sliding your spatula to the bottom of the bowl and back up to make sure no pockets of dry ingredients remain.
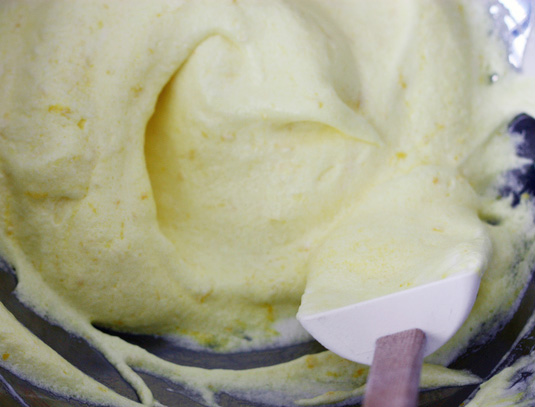
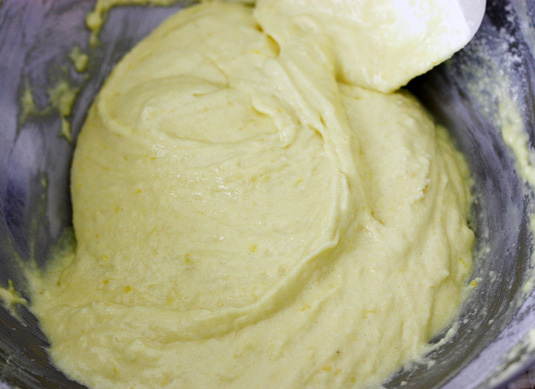
When your batter is evenly blended, it will look shiny and creamy:
How to Make Macarons
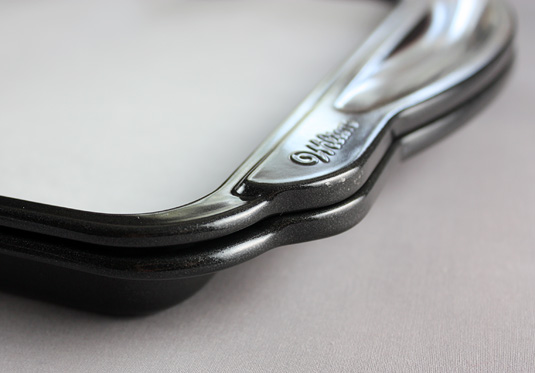
Prepare your baking sheets. Double the baking sheets (helps macarons rise and cook more evenly) then cover each with a well-measured sheet of parchment paper. I have tried silicon mats before and I don’t think they work well with macarons. Their rubbery texture seems to cling to the delicate and somewhat sticky cookies so that you more often than not end up with empty shells (the tender insides remaining stuck to the silicon).
How to Make Macarons
Now is the time to fit your pastry bag with its tip. I like to use disposable pastry bags that I wash 3-4 times before getting rid of them. I find that plastic pastry bags are more flexible and easier to work with than textile bags. They are also really easy to clean just by letting hot water run through them and they don’t stain.
To make the transfer from bowl to pastry bag easy, I stand my pastry bag in a measuring cup, folding or twisting the tip to make sure the batter doesn’t come out too quickly. If your pastry bags are long, fold it in half to make sure the batter gets to the bottom of the bag.
How to Make Macarons
Take your bag out of the cup, keeping the tip folded or twisted so that the batter doesn’t come out. Unfold the larger end of the bag and twist it shut close to the batter to push it down. As you lay your macarons on the cooking sheets, you will continue this motion (twisting the larger end of the bag with one hand) to put constant pressure on the batter and ease its way out on the sheets.
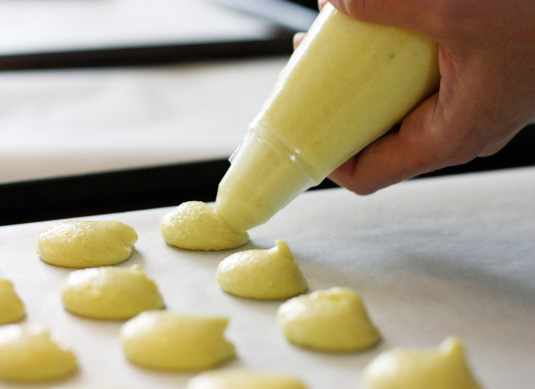
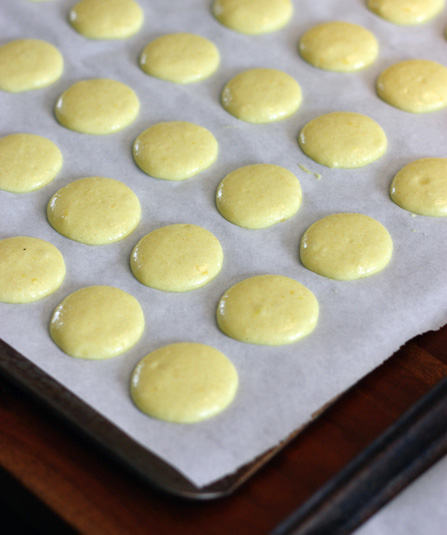
Now is the time to work your magic: you have to hold the tip of your bag with one hand to guide it, and hold the larger end with your other hand to push the batter down. Place your tip close to the parchment paper and twist the end of the bag so as to push the batter down and out to form 1 to 1.5” disks. You can set your macarons pretty close together as they won’t expand while cooking. When enough batter is out, stop twisting the end of the bag and swiftly lift your tip up to stop the batter from coming out. This is tricky: you will need practice. Mastering this technique will ensure your macarons are uniform in size and round.
How to Make Macarons
Now, don’t panic. Your macarons have a pointy tip that makes them look like lazy Hershey’s Kisses. Not to worry: as they rest before cooking, they will smooth out. You can help them though: lift your baking sheet up a bit and firmly bang it on the table a couple of times. This will even the caps and take the air bubbles out of them.
If you’re a perfectionist like I am, now is a good time to edit your macarons to make sure they will be perfectly round. I use a small silicon spatula to make oval caps round or smooth down tips that won’t come down. This step is absolutely not mandatory; imperfection can be very charming.
The next step will once again test your patience: you have to let your macarons rest on the baking sheets at room temperature for at least 20 minutes (some say a couple hours is best but I’m not that patient). You just have to. This step will “dry” the caps and help them rise later when they cook.
How to Make Macarons
Halfway through the wait, preheat your oven between 275 and 300°F (135-150°C). Every oven behaves differently. I have a gas oven and 300°F (150°C) is generally good for me. In some ovens, this temperature can be too hot, especially for light-colored macarons (you don’t want them to brown). I prefer to play it safe, cook them at a lower temperature and leave them longer in the oven. You will have to test your own oven and stay close to it to watch over your macarons as they cook.
I baked these lemon macarons at 300°F (150°C) for 14 minutes. Your cooking time could be anywhere between 13 and 18 minutes. From 12 minutes on, watch closely, and avoid opening your oven door before that. Your macarons are ready when they look dry and matte and seem firm on their crown when you lightly tap on them. Overcooking the macarons will make them too crunchy and feel like meringue. Undercooking them will make them separate when you try to lift them off the sheets. I know, it’s tricky! After a while, you will know your oven and get better at figuring when your macarons are done. In any case, please play it safe when setting your oven temperature. Excessive heat is the macaron’s worst enemy: they will cook too quickly, cracking like meringue and browning, hiding their beautiful color.
When they are done, take the sheets out of the oven and let them cool on a rack. If you need to reuse your baking sheets for the next batch, let them cool 5-10 minutes in the baking sheet and then lift the parchment paper out of the sheet to set it directly on the cooling rack (this is why it’s good to have more than 2 sheets).
Once cooled to room temperature, your macarons are ready to be assembled.
How to Make Macarons
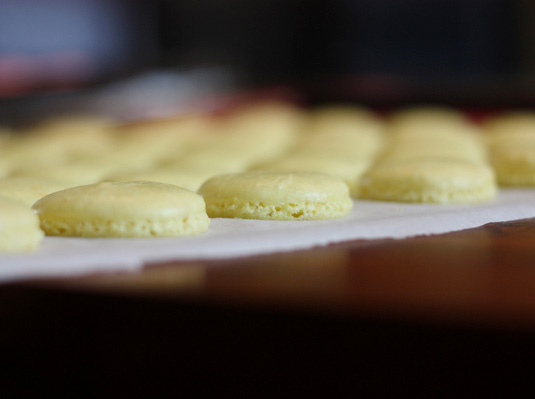
When they are perfectly cooked, they should lift easily from the parchment paper, have a flat bottom and a beautiful puffy crown. If they stick a bit, help them up with a thin stainless steel spatula so that they don’t separate or break. If they’re a bit overcooked, they will be hollow under the cap. You can still use them, you’ll just have to put more cream to assemble them (yum!).
Match the cap sizes that fit best together. For the filling, the possibilities are as great as your imagination is. For lemon macarons, you can fill them up with lemon curd as I did, or with a lemon-flavored buttercream. If you made pink cookies, fill them up with good-quality raspberry preserves or, if you feel decadent, with a mixture of mascarpone cheese and preserves. The only thing that’s important is to make sure the filling is firm enough to not drip out from the macarons. A great macaron should be able to stand on its side and not lose its filling.
Using an icing spatula (or just a regular butter knife) spread your icing on one cookie. Place the other cookie on the icing and press gently to stick them together.
Once all of your macarons are assembled, in an ideal world, you would put them in an airtight container, in the refrigerator and let them rest for another 24 hours. Yes, you need patience once again. They won’t be bad if you eat them right away. Letting them rest with their icing in really reveals the fine texture of the macaron. The humidity of the icing will get into the crispy caps and that’s what will make them crisp on the outside and so tender on the inside. Try to be patient, trust me, it’s really worth the wait. The good thing is that it’s a great dessert to make in advance and it will for sure impress your guests. They will be at their best if you eat them in the next 4-5 days.
Yes, these French cookies are a really fancy delicacy. No, they’re not easy to make. Yes, they require time, patience and practice to master. But it’s worth it really, and less expensive than a plane ticket to Paris.


Source:  http://foodnouveau.com/2010/03/29/destinations/europe/france/how-to-make-macarons-a-detailed-illustrated-step-by-step-recipe/